ドットインストールでUnity入門してみる
ドットインストールは1つ3分動画でわかりやすく教えてくれるサイトだ。Unity入門は 26レッスンなので全部で3×26=78分程の動画となる。


Unity入門で作成するのはfloorにPaddleを置いて矢印キーで左右に動かし、次々と流れてくるBallをキャッチするゲーム。BallがキャッチできなかったらGame Over。
このゲーム作成を通して以下のようなことが学べる。
- Unityの基本的な操作の仕方
- Project: 一番大きな単位はプロジェクト。その中にSceneを作っていく。
- Scene: 二つのScene(MainSceneとGameOverScene)を作りその切り替え方法
- View: SceneView(Unity上での操作視点)とGameView(カメラ視点)がある。
- Scene上に配置するGameObject(floor,Paddle,Ball)の作成と変更方法
- Inspector: GameObjectの詳細な情報を表示し編集できる。コンポーネント(Script(C#),Metrial等)を追加できる。
- Scriptを生成するとMonoBehaviourの派生クラスが定義され、publicなデータメンバを追加するとUnityのInspectorで値の変更ができる。
- Scriptでは1フレーム毎の処理等のコードを書ける。
- 同じインスタンス(Ball)がたくさんある場合はPrefabにすることでテンプレートとなりScriptで生成できる。
Unity入門
#01 Unityを使ってみよう

UnityのサイトからUnity Hub(2.4.2)をダウンロード&インストールする。動画ではMacだが、Windowsを使っているのでへぇMacってそうなんだと思いながら見る。
#02 プロジェクトを作ろう
- Unity Hubを起動し、Unity(2020.1.16f1)をインストールする。
- プロジェクトを作る。
#03 画面の見方を確認しよう
- Sceneはゲーム中の画面のこと。
- HierarchyにあるCameraやLightをGameObjectと呼ぶ。
- GameObjectを選択するとInspectorで詳細を見ることができる。
- SceneViewはゲームの編集画面。ここにGameObjectを配置していく。
- GameViewはカメラが映しているゲームプレイヤーが見る画面。

#04 視点の操作をマスターしよう
- GameObject Cubeを配置する。
- Alt(MacはOption)キーを押しながらマウスを動かすと視点が変わる。
- マウスホイール(Macのタッチパッドなら2本指のスワイプ)
- 手のひらツールで移動。
- HierarchyのGameObjectをダブルクリックすると中央配置。
- Xは左右、Yは上下、Zは手前奥方向
- Yをクリックすると真上(Top)からのView
- Zをクリックすると手前(Front)からのView
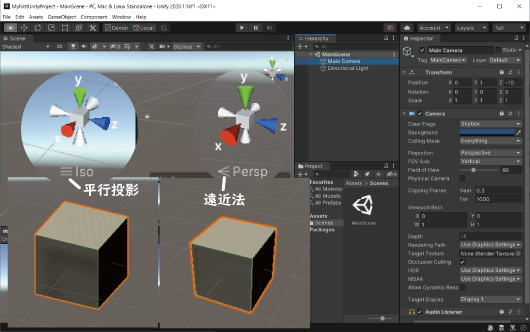
- XYZ軸の下で遠近法と平行投影を切り替えられる。
#05 GameObjectを操作してみよう
- 比較のためGameObjectのShpereを作る。
- キーボードの並び順にQWERTYとショートカットキーが割り当てられている。
#06 Inspectorを使ってみよう
- InspectorのTransform
- Position(位置)
- Rotation(回転)
- Scale(拡大縮小)
- ︙(縦三点リーダー)アイコンでResetが選べる。動画では歯車アイコン。
- SceneViewで操作する方法もあるが、等間隔に並べる等ではInspectorで入力する方が便利。
- MainSceneを保存する。
#07 ゲームを作っていこう
- ゲームを作るので新規にプロジェクトを作成する。
- 最初に作ったプロジェクトは閉じる。
- 完成版ゲームを見せながら説明。
#08 床とパドルを配置していこう
- Cubeを作ってFloorという名前にする。
- InspectorでScaleXを10,Zを20にする。
- Cubeを作ってPaddleという名前にする。
- InspectorでPositionYを1にしてFloorの上に出るようにする。
- ScallXを5とする。
#09 Materialを使ってみよう
- 色を変えるのにMaterialを使う。他のSceneでも使うものなのでプロジェクト共通の部品としてつくる。
#10 カメラの位置を調整していこう
- Main Cameraを選んでいる状態で、GameObjectメニューのAlign With Viewを選ぶとSceneViewの視点がCameraの位置になる。
- CameraのInspectorでGameの背景色を変更できる。
- 単色にするためにClear FlagsをSolid Colorに変える。
- Background
#11 パドルにスクリプトを設定しよう
- PaddleをクリックしてInspectorのAdd ComponentでScriptを追加する。
- Edit Scriptでエディタを起動する。言語はC#。
#12 パドルの位置を操作してみよう
PaddleScript.cs
using System.Collections;
using System.Collections.Generic;
using UnityEngine;

public class PaddleScript : MonoBehaviour
{
    // Start is called before the first frame update
    void Start()
    {

    }

    // Update is called once per frame
    void Update()
    {
        transform.position += new Vector3(Input.GetAxis("Horizontal") * Time.deltaTime, 0f, 0f);
        Debug.Log(transform.position.x);
    }
}- Time.deltaTimeを掛けると早いマシンでも遅いマシンで速度が同じになる。
#13 ゲームを動かしてみよう
- [Window]-[General]-[Console]でコンソールを開く。
- Playモード中にSceneViewを編集できるがPlayモードを解除すると元に戻ってしまうのでPlayモード中だとわかりやすいように色を変更する。
- [Edit(動画ではUnity)]-[Preferences]-[Colors]-[Playmode tint]
#14 Inspectorで変数の値を操作しよう
- 動きが遅いのでspeed変数を追加する。
- メンバ変数をpublicにすることでInspectorで変更できるようになる。
PaddleScript.cs
using System.Collections;
using System.Collections.Generic;
using UnityEngine;

public class PaddleScript : MonoBehaviour
{
    //private float speed;
    public float speed;

    // Start is called before the first frame update
    void Start()
    {
        //speed = 5f;
    }

    // Update is called once per frame
    void Update()
    {
        transform.position += new Vector3(Input.GetAxis("Horizontal") * Time.deltaTime * speed, 0f, 0f);
        //Debug.Log(transform.position.x);
    }
}
#15 ボールを配置してみよう
- Sphereを追加してBallという名前にする。
- TransformをResetする。
- 奥の方から手前に動かしたいのでPositionZを12にする。
- Floorの上に出すので、PositionYを1にする。
BallScript.cs
using System.Collections;
using System.Collections.Generic;
using UnityEngine;

public class BallScript : MonoBehaviour
{
    private float speed;

    // Start is called before the first frame update
    void Start()
    {
        speed = Random.Range(5f, 15f);
    }

    // Update is called once per frame
    void Update()
    {
        transform.position += new Vector3(0f, 0f, -1 * speed * Time.deltaTime);
    }
}
#16 プレハブを使ってみよう
- Ballをプレハブ(Prefubs)にするとテンプレートとして好きなタイミングで好きなだけ複製できるようになる。
- HierachyのBallをProjectのAssetsにドラッグ&ドロップする。
- HierachyのBallは青色に変わる。Scriptから生成するのでこちらは削除する。
- Ballを生成するためのScriptを追加するためCreate Emptyで空のGameObjectを作り名前をBallFactoryにする。
- InspectorでTransformをResetしPositionYを1、Zを12にする。
- Add COmponentでBallFactoryScriptという名前のScriptを追加する。
- BallFactoryScriptにpublic GameObject ballメンバを追加する。
- InspectorからballにPrefabsのBallをドラッグ&ドロップし結びつける。
#17 ボールのインスタンスを生成しよう
InstantiateでBallがインスタンス生成されるのを確認する。
BallFactoryScript.cs(一部)
    void Start()
    {
        Instantiate(ball, transform.position, transform.rotation);
        //InvokeRepeating();次のレッスン
    }

    void SpawnBall()
    {

    }
繰り返し生成するためにInvokeRepeating()を呼び出す。そこから呼び出すメソッドをSpawnBall()とする。
#18 一定時間ごとにボールを生成しよう
BallFactoryScript.cs
using System.Collections;
using System.Collections.Generic;
using UnityEngine;

public class BallFactoryScript : MonoBehaviour
{
    public GameObject ball;

    // Start is called before the first frame update
    void Start()
    {
        //Instantiate(ball, transform.position, transform.rotation);
        InvokeRepeating("SpawnBall", 0f, 1f);
    }

    void SpawnBall()
    {
        Instantiate(ball, new Vector3(Random.Range(-5f, 5f), transform.position.y, transform.position.z), transform.rotation);
    }

    // Update is called once per frame
    void Update()
    {

    }
}
動かしてBallが繰り返し生成されることを確認する。
#19 パドルとの衝突判定をしてみよう
- 衝突判定をするためPrefabsのBallにRigidbodyコンポーネントを追加する。
- Rigidbodyを加えると質量とか重力とかの物理挙動を加えることができる。
- 今回重力は使わないのでUse Gravityのチェックを外す。
- 衝突判定でPaddleを識別するためにTagを追加する。追加したTagをPaddleに設定する。
- C#の編集をVS2017でしていた。補助機能が効かないと思っていたらUnityのプロジェクト設定が足りなかった。[Edit]-[Preferences]-[External Tools]-[External Script Editor]を使用している[Visual Studio Comminity 2017]にする。
BallScript.cs
using System.Collections;
using System.Collections.Generic;
using UnityEngine;

public class BallScript : MonoBehaviour
{
    private float speed;

    // Start is called before the first frame update
    void Start()
    {
        speed = Random.Range(5f, 15f);
    }

    // Update is called once per frame
    void Update()
    {
        transform.position += new Vector3(0f, 0f, -1 * speed * Time.deltaTime);
    }

    private void OnCollisionEnter(Collision collision)
    {
        if (collision.gameObject.CompareTag("Paddle"))
        {
            Destroy(gameObject);
        }
    }
}
動かしてPaddleにBallが当たると消えるのがわかる。
#20 パドルの幅が狭くなるようにしよう
BallScript.cs(一部)
    // Update is called once per frame
    void Update()
    {
        transform.position += new Vector3(0f, 0f, -1 * speed * Time.deltaTime);
    }
動かすとBallが当たるたびにPaddleが短くなる。
#21 ゲームオーバー処理を作ろう
BallScript.cs(一部)
    // Update is called once per frame
    void Update()
    {
        transform.position += new Vector3(0f, 0f, -1 * speed * Time.deltaTime);
        if (transform.position.z < -10.0f) // 動画では-13.0f
        {
            Debug.Log("Game Over");
            Time.timeScale = 0;
        }
    }
#22 新しくシーンを作ってみよう
- [File]-[Save]で今のSceneを保存する。
- [File]-[New Scene]で新しくSceneを作る。
- Main CameraのClear FlagsをSolid Colorにする。
- [Hierachy]の[+]-[UI]-[Text]でTextを生成する。
- CanvasのInspectorで[Canvas Scaler]-[UI Scale Mode]を[Scale With Screen Size]にする。
#23 テキストを設定していこう
- Textの位置をReset
- Textの中身を[Game Over]とする。
- [Font Style]を[Bold]
- [Font Size]を[48]
- [Alignment]をセンターへ
- [Horizontal Overflow]を[Overflow]
- [Color]を変更
#24 シーンを切り替えてみよう
- [Hierarchy]-[+]-[UI]-[Button]
- Buttonの位置をReset
- ButtonのWidthを200,Heightを50,Pos Yを-80
- ButtonのTextの中身を[Replay?],Font Sizeを28
- GameOverSceneをMainSceneから呼び出せるようにする。
- Scenesフォルダを指定する。
- [File]-[Build Settings]
- [Scenes in Build]にすべてのSceneをドラッグ&ドロップする。
BallScript.cs(一部)
using UnityEngine.SceneManagement; // Update is called once per frame
void Update()
{
transform.position += new Vector3(0f, 0f, -1 * speed * Time.deltaTime);
if (transform.position.z < -10.0f) // 動画では-13.0f
{
//Debug.Log("Game Over");
//Time.timeScale = 0;
SceneManager.LoadScene("GameOverScene");
}
}- Sceneを保存。
- MainSceneに切り替え。
- MainSceneからGameOverSceneに切り替わる動作を確認。
#25 ボタンが動作するように設定しよう
- ButtonにScriptを追加
ButtonScript.cs
using System.Collections;
using System.Collections.Generic;
using UnityEngine;
using UnityEngine.SceneManagement;

public class ButtonScript : MonoBehaviour
{
    public void ReplayGame()
    {
        SceneManager.LoadScene("MainScene");
    }

    // Start is called before the first frame update
    void Start()
    {

    }

    // Update is called once per frame
    void Update()
    {

    }
}- ButtonのInspectorで[On Click]-[+]
- ObjectにButton自身をドラッグ&ドロップ
- Functionに[ButtonScript]-[ReplaceGame()]
- MainSceneで動作確認して[Replay?]ボタンでMainSceneに戻ることを確認
#26 ゲームを書き出してみよう
- [File]-[Build Settings]
- Platform:[PC, Mac & Linux Standalone]
- Target Platform:[Windows]
- [Build And Run]で場所を指定するとビルドして実行される。
ドットインストールのUnity入門完了!